
I had the chance to make a quick mining hashrate test on Sapphire Nitro+ Rx 580 8GB GPU (thanks to Novan), after few tries and a bit of research i have found the best timings for this card, at least for now.I know a lot of you guys were waiting for this post but i was really busy testing other cards from 500 series and also building frames for rigs.
The max hashrate i could get is 30.2 Mh/s on Ethereum and on dual 30 Mh/s Ethereum, 870 Mh/s for Decred and 300 Mh/s on Pascalcoin, with 130w – 150w power consumption.
So like i said, those are some quick/fast tests via teamviewer, didn’t had the chance to play more with the settings or bios for too long, but we god some good results, i am pretty happy with. For sure there is still room for improvements (if not hashrate then maybe power consumption) but at least this is a good start.
Let’s get started
Sapphire Nitro+ RX 580 8GB Mining Performance Review
Like always, to not make any confusion on card, here is the exact model for this tutorial

1 Tools and Software needed
- Combined AMD Drivers (check here how to do it) 16.11.5 http://support.amd.com/en-us/kb-articles/Pages/Radeon-Software-Crimson-Edition-16.11.5-Release-Notes.aspx + 17.5.1 http://support.amd.com/en-us/kb-articles/Pages/Radeon-Software-Crimson-ReLive-Edition-17.5.1-Release-Notes.aspx
- AMD/ATI Pixel Clock Patcher https://www.monitortests.com/forum/Thread-AMD-ATI-Pixel-Clock-Patcher
- Sapphire Trixx http://www.sapphiretech.com/catapage_tech.asp?cataid=291&lang=eng
- ATIFlash 2.74 https://www.techpowerup.com/download/ati-atiflash/
- GPU-Z https://www.techpowerup.com/download/techpowerup-gpu-z/
- Claymore 9.3 https://mega.nz/#F!O4YA2JgD!n2b4iSHQDruEsYUvTQP5_w
IMPORTANT: Before starting to make any bios modification, install and combine AMD Drivers and do not restart, start atikmdag-patcher.exe and apply the patch (if needed), after this you can restart the pc. If you don’t this the GPUs wont work with the new modded bios flashed.
2 Backup OC BIOS
- Point 2 from previous tutorial: click here

3 Switch BIOS
- Point 3 from previous tutorial: click here

4 Backup “Silent” BIOS
- Point 4 from previous tutorial: click here
5 Download BIOS
Important, this BIOS is for Hynix memory only! Check your memory with GPUz software
- V1: https://mega.nz/#!ZxQEwCDC!vSgnjdHRE0rpk7L8I95WQXPRkrT0lbrTDOcn6iQWRoI
- V2: https://mega.nz/#!R0gCkajK!OAp3e4YrXowsd-IWgAphRQdBAKEMZuO6SxZwu0U2mlk
You can test both versions, basically the V1 should use less power than V2, but you can test both with same settings and compare the results. No undervolt was applied in bios, you must do it from trixx, msi afterburner or claymore miner.

6 Flash BIOS with ATiflash
- Point 5 from previous tutorial: click here


6 Claymore 9.3 + underclock + undervolt
- Download and extract Claymore miner
- Right click on start.bat fileand click “Edit“
- Paste the following code: “
EthDcrMiner64.exe” (replace details with yours)
-epool eu1.ethermine.org:4444 -ewal ETH_WALLET.WORKER_NAME -epsw x
-dpool dcr.suprnova.cc:3252 -dwal SUPRNOVA_USERNAME.WORKER_NAME -dpsw
WORKER_PASS -tstop 85 -tt 65 -fanmin 60 -fanmax 100 -cclock 1130 -mclock
2150 -cvddc 850 -mvddc 850 - save,close and run start.bat
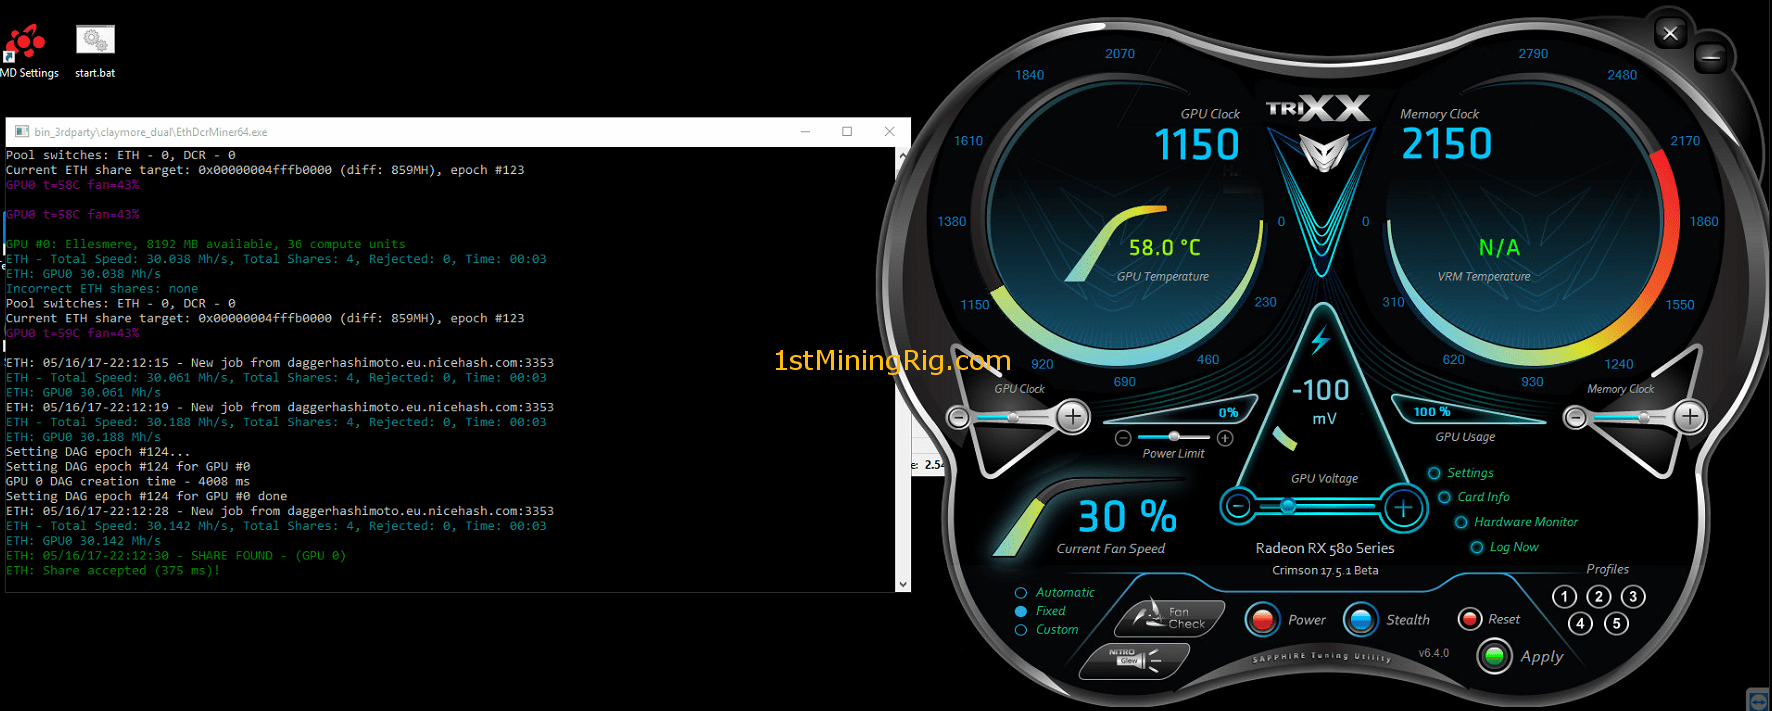
If you are going to use my claymore miner code then there is not need to start Sapphire Trixx or MSI Afterburner to make changes on clocks or undervolt. With this settings added, claymore miner can give same or even better results than Trixx or MSI.
However if you are going to use Trixx or MSI Afterburner set the following vales
- GPU Clock: 1150 or 1130
- Memory Clock: 2150
- -mV: 100 or 150 (for msi -100 is max)
Power draw (dual mining only)
- GPUz: 90w – 95w
- From wall: 130w – 150w
Hashrate
- Ethereum: 30.14 Mh/s
- Ethereum + Decred: 30 Mh/s and 870 Mh/s
- Ethereum + Pascalcoin: 30 Mh/s and 300 Mh/s
Full 6x GPUs rig should draw around 1100w with this settings!


That’s it guys for the first 500s GPU tested by me, I hope this will be helful for many of you.
Also let me know what are your results for hashrate and power draw for a full rig, very important if possible to attach screenshots.